Work Flow
Introduction
For a better experience, please use Cinema 4D R26 or higher versions
Manage your projects and assets inside Cinema.
For data security, Work Flow does not provide any delete and overwrite operations.
Note: this document need to translate to English(not done yet), look at FlowUs full docs for now
Quick Intro
Work Flow Common Process : Add Root Pool - - > Create Root - - > Create Project
This plugin manages data by paths and file names, which means:
Advantages : no encryption of paths, can continue to work without the plugin and still be an organized file structure
Cons : Being name and path based means that if you change the name or path it will not work as expected.
😊 Work Flow provides some tools to manage your files and projects with just a few clicks and users don't need to memorize the file structure.
Quick Highlights
C4D's internal resource management eliminates the clutter caused by dozens of windows open.
Provides three ways to navigate files: expand, tree directory and filtering
Operational logic similar to Windows Explorer with no learning costs.
Simple I/O, such as double-clicking to import or open a file, and drag-and-drop to export.
Optimized workflow in C4D's internal GUI manager.
Deeply integrated with Render Flow plugin for twice the effort in joint use (compatible with Render Flow for creating project trees).
Shortcut
Alt-Click : Open the folder where the selected object is located
H : returns to the current project root directory
R : Refreshes the tree directory
I (3) : _IN folder (files received from clients, etc.)
O (4) : _OUT folder (output files sent to customers, etc.)
1: 3D project folder
2: 3D project's tex folder.
Ctrl C : Copy file
Ctrl V : Paste file
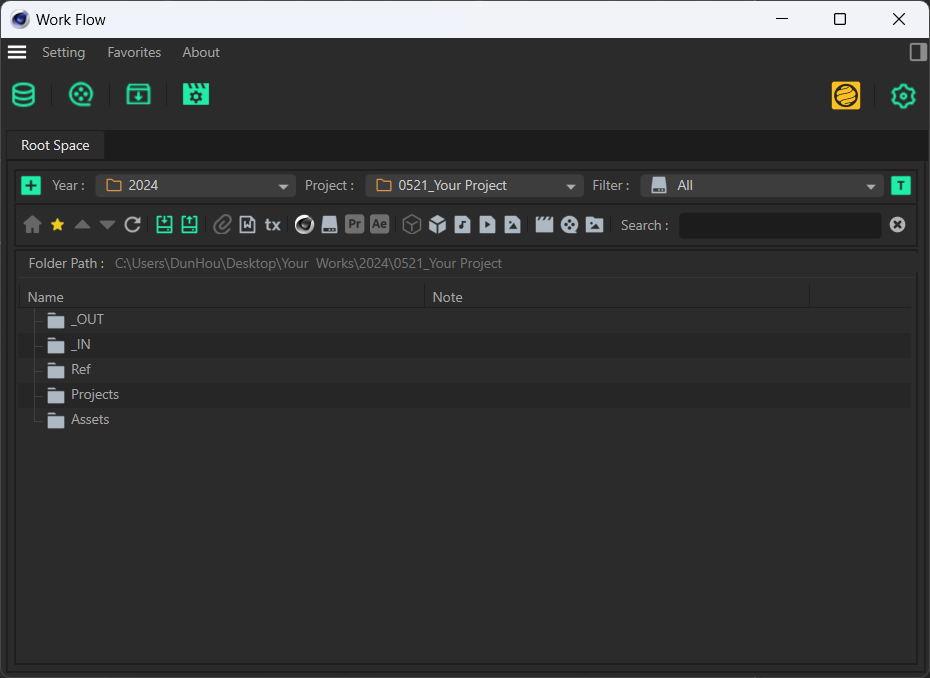
Project Management
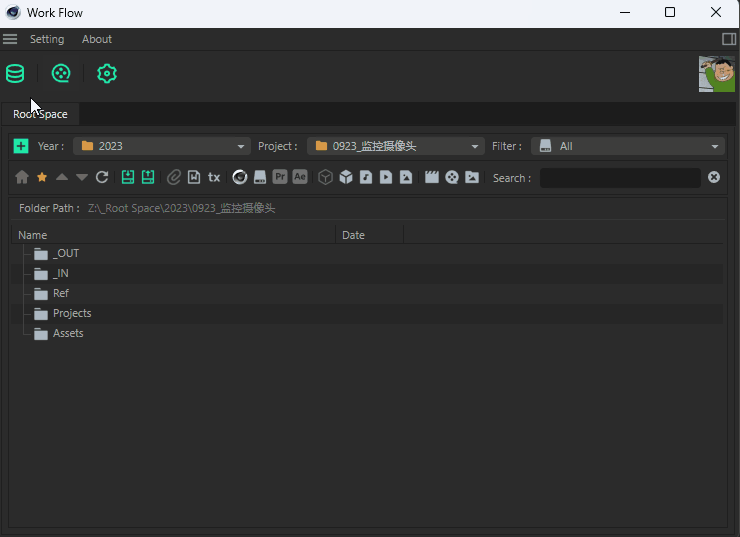
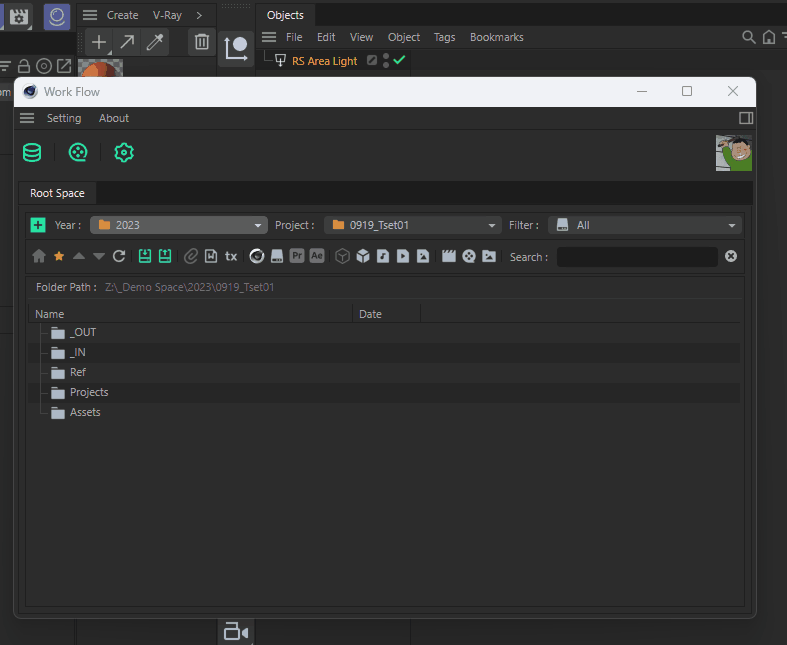
Root Structure
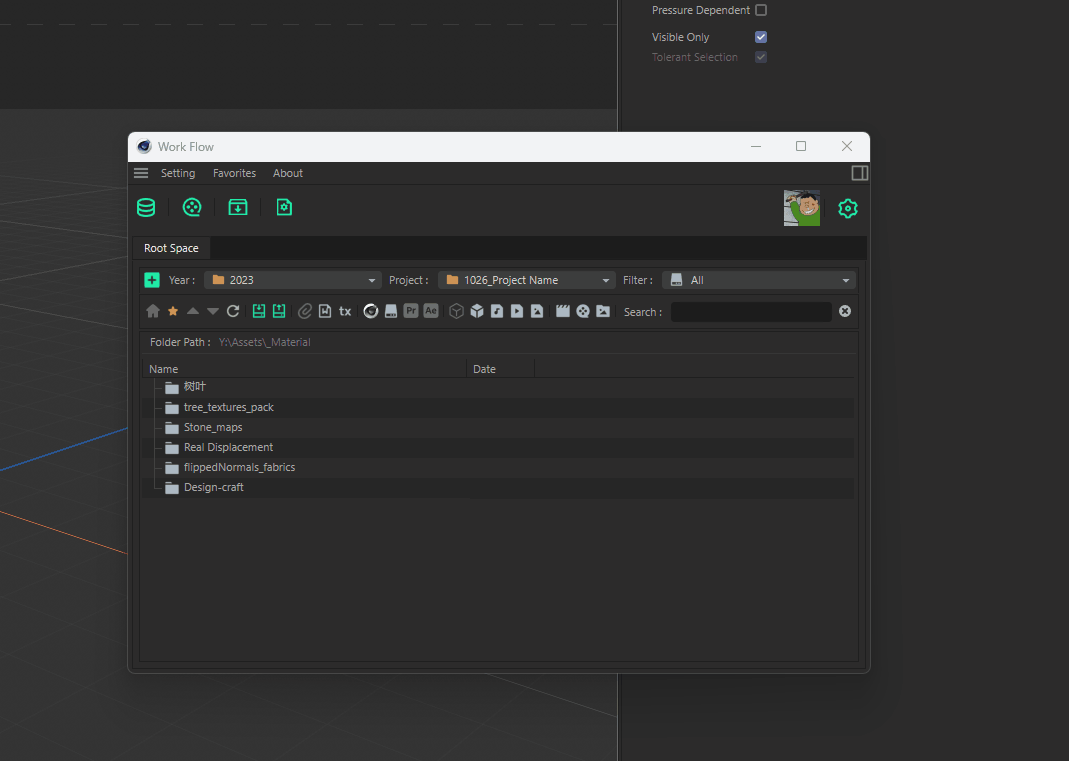
For example, Sets the project pool directory to the Root Space folder under the D drive and creates a project with the name 1026_Project Name
+ Z:\_Root Space # Root Space(Do not use the disk root)
+ 2022
+ ...
+ 2023 # Yesrs Folder
+ ...
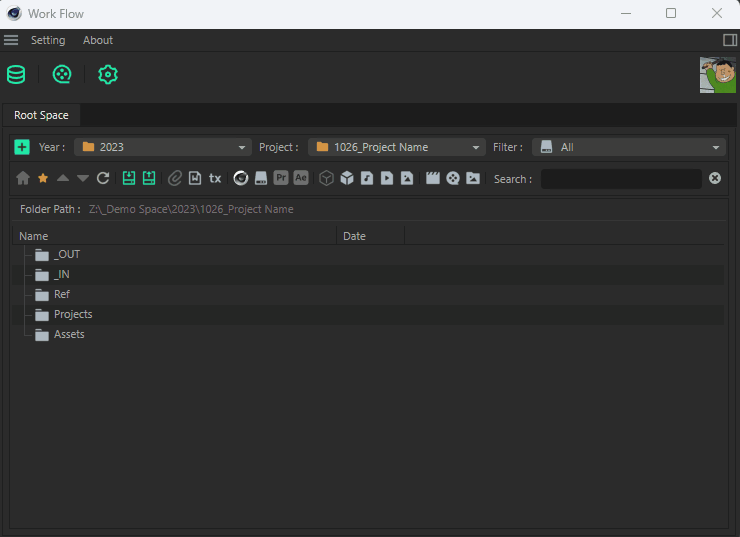
+ 1026_Project Name # MMDD_Project Name
+ _IN : Incoming files (e.g. documents provided by customers, etc.)
+ _OUT : Output files (e.g. screen shots, single frames, etc. sent to customers)
+ Ref : Reference collection
+ Projects : Projects (3D/Comp/Edit) (important folder, don't change name and path)
+ Assets : Assets used by the projectProject Name Structure
Filename_Remarks (optional)_Shot010_v1_1028.c4d ++> Project_render_Shot010_v1_1028.c4d
Filename : the name of the project, can be any character except the underscore.
Remarks (optional) : Characters that can be omitted, between the filename and the lens identifier (_Shot), can be remarks such as author or function
Shot010 : Shot is the identifier, the next two digits represent the version number, the last digit is a placeholder for a new shot, e.g.: 011 means, this is shot 01, and inserts the new shot between 01 and 02.
v1 : v is the identifier , can be followed by a number, represents the version number .
1028 : is an identifier*, followed by a four digit number representing the modification date.
New Root Space
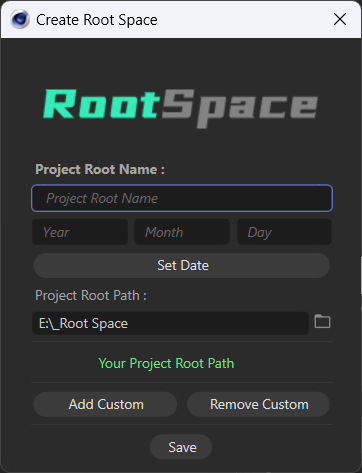
Generate Work Flow standard folder structure
No new C4D file will be created, you need to use New Project to create one.
Generate the path :... \Root Space\Year\MM(Month)DD(Date)_Project_Name\...
Root Space: represents the local project pool directory, the last path will be saved automatically, theoretically you only need to set it once.
Project Structure
Root Space : e.g. D:\RootSpace
Year : e.g. 2024
Project : e.g. 0606_TestProject, means the project named "TestProject" create at 202/06/06
Default Top Folder Structure
_IN : Incoming files (e.g. documents provided by customers, etc.)
_OUT : Output files (e.g. screen shots, single frames, etc. sent to the client)
Ref : Reference collection
Projects : Projects (3D/Comp/Edit) (most important folder, don't change name and path)
Assets : Assets used by the project
New Project
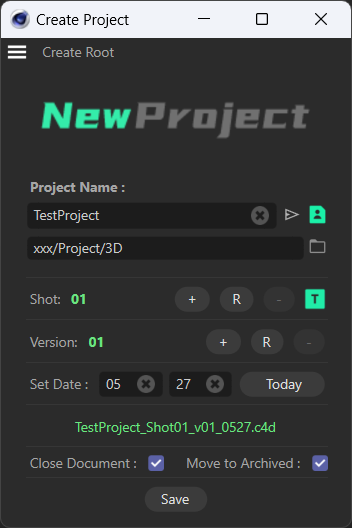
Project Name: the name of the project, if you have opened the standard project name, the project name will be loaded automatically.
Project Path: read the 3D folder of the current project (in the settings, change it to the 3D folder in the last new Root Space).
Shot: Shot number, initially 010, if you have opened the standard project name, the project shot number will be loaded automatically.
disable the sub shot number to use xx format rather than xxx
+ /- : increase or decrease the number
R : reset the number
T : input the number
Version: version number, initially 1, if the standard project name has been opened, the project version number will be loaded automatically.
+ /- : increase or decrease the number
R : reset the number
Date: date number, initially the current date, if the standard project name has been opened, the project date number will be loaded automatically.
Today : Set the date number to today.
Project Name Preview : this shows how your project looks like
Close Document : Close current project when create new project.
If the current project is saved, this will be on by default.
Move to Archived : Move the current project to 'Archived' folder when create new project.
Save : Create new project.
Project Name
Example : ProjectName_Shot010_v1_1216.c4d
Project name + Shot number + Version + Modification date
Project name: the name of the project, in plain characters, preferably without underscores.
Shot number: Shot number, use underscore (_) + Shot + three digits (010) to show that
_Shot is a fixed format
First digit: placeholder for tenths, used when there are more than 9 shots.
Second digit: placeholder for the first shot 010
Third number: insertion placeholder, used when adding shots, such as 010 and 020 to add shots, use 011
this can be disabled by Setting dialog
Version number: the iterative version of the project, indicated by underscore (_) + v + number
Modification date: the date of modification of the project, using the underscore ( _ ) and four digits to indicate that
Detail Information

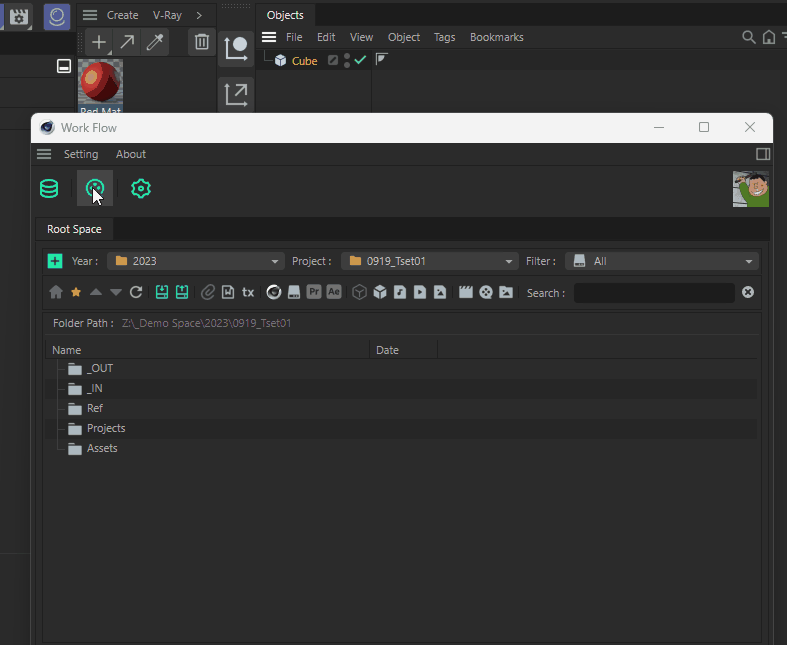
Menu
Setting :
Root Manager
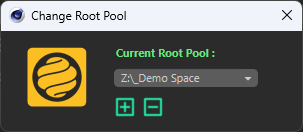
+ : add a new project pool
- : deletes the project pool (only the identification is deleted, not the local files)
dialog box : switch the directory of the active project pool
Edit User
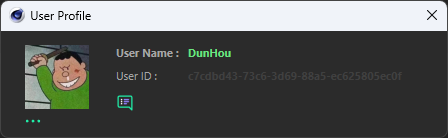
you can set user avatar and user name
you can hide the avatar in the settings
Edit Regex
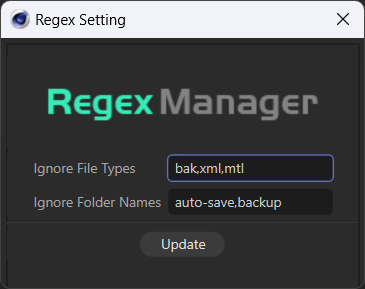
Ignore File Types : Split by , those file extensions will not show
Ignore Folder Types : Split by , those folder names will not show
Favorate :
Add Favorites : Select a folder and add it to Favorites (Ctrl-click on the Favorites button to add it as well).

Delete Favorites : Use the Favorites Manager to delete the corresponding favorites directory.
Menu Button
Preview Layout :
Opens (closes) the preview window, which only takes effect when the image/projects is selected.
Can be set in settings to turn on at startup
Project preview need to check the Setting - C4D file preview
Main Button :

Edit Root Space :
Make Preview : Export the preview to ../Project/3D/Preview folder.
Use Windows renderer (show model only, turn on FXAA, oversample 2x2)
Automatically jump to the preview folder after exporting, you can double-click to play or Alt-click to open the folder and so on.
Collect Textures : Localized all the textures and copy them to local tex folder.
Auto Render Path :
Click : Set a animation path to ../Project/3D/RenderSEQ folder with custom token.
Ctrl : Set a stillframe path to ../Project/3D/StrillFrame folder
Alt : Set a animation path to ../Project/3D/RenderSEQ folder with custom token, but with a user path.
User Scripts :
You can put your python scripts in the User Scripts folder inside the plugin, the scripts will show here:
Quick View : Set the current viewport as perspective/quick shading/hide workplane
Set Camera Name : Set the scene camera with the project name, if the project is a Work Flow format, use the real name.
Switch Xray : Switch the xray display of all selected objects
Setting :
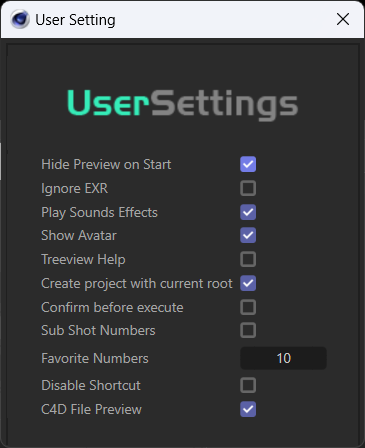
Hide preview on start : Enable by default, hide the preview window when launching the plugin.
Ignore EXR : enabled by default, the preview window ignores the EXR folder (because there are multiple layers of EXR, it can't be previewed correctly)
Play sound effect : Enable by default, when notification is made, it will be accompanied by a sound effect.
Show avatar : Enable by default, show user's avatar (user's information is not useful for now, it can be personalized, so keep it)
Play sound : Enabled by default, accompanied by sound effect when notification is made.
Confirm before execute : Ask when you hit a main button
Sub Shot Numbers : False to disable the sub number of the shot
Create project with current root : On by default, use the current (active project) 3D directory to create a new project, if it is off, then only use the directory of the last new project.
Number of favorites : 10 by default, the maximum number of favorite paths.
Disable Shortcut : Disable the dialog shortcut
C4D File Preview : If the preview area can show the c4d files.
Filter :

Year : Current year to get our projects
Project : Projects of current year, select to set the active project
Rename Project : rename the project
Filter : the filter mode
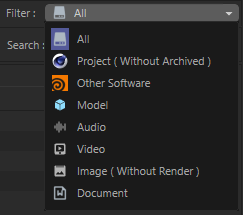
All: all files are not filtered (displayed), in this case the quick access button below is activated
Project (excluding archive): show all C4D files under the project, excluding backups in the archive folder.
Other Software: Show other CG software projects under the project.
Model: Show common model formats and proxies under the project.
Audio: Show commonly used audio formats under the project
Video: displays commonly used video formats under the project
Images (excluding rendering): displays commonly used image formats under the project (excluding the rendering folder)
Documentation: Shows commonly used documentation formats under the project
Quick Access

Address bar : the core basis for navigating and finding files in Work Flow, reflecting the physical location of files on the hard disk.
Home: shortcut key is H (English input method), locate to the root folder of current project.
Favorites: show the path of user's favorites, the maximum number can be changed in the settings.
Up: return to the previous directory
Down: Goes to the currently selected object (the object needs to be a folder).
Refresh: shortcut key is R (English input method), refreshes the directory (usually refreshes the directory after the user deletes a local file).
Input folder: the shortcut key is I or 3 (English input method), it is used to store the received files, for example, files provided by the customer.
Output folder: shortcut key is O or 4 (English input method), used for storing files that are sent, e.g., delivered to the customer.
Reference: Used to store reference files.
Documentation: Used for storing various scripts, subplots and other documentation files.
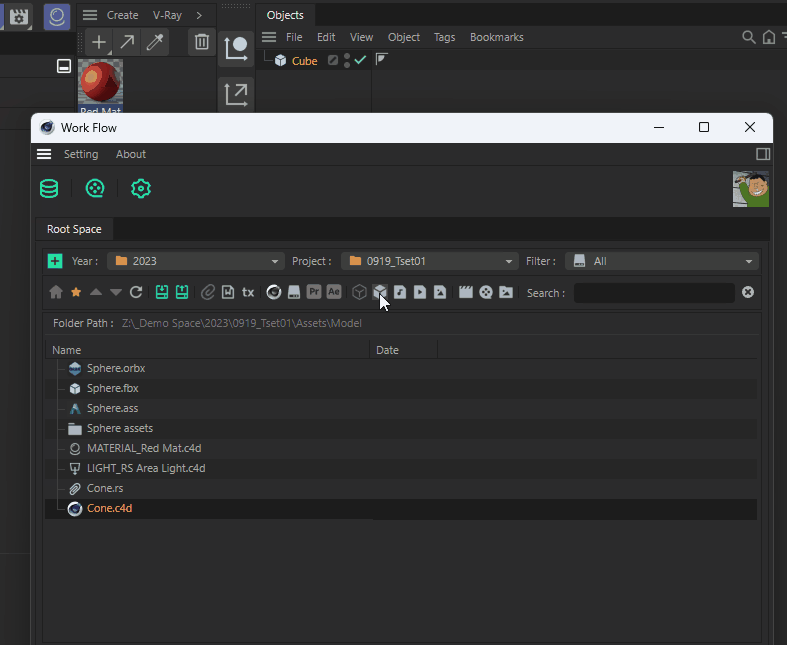
tex: the tex folder of C4D project folder, used to store the project texture
3D folder: shortcut key is 1 (English input method), important folder, store 3D project files (.c4d) and related folders
Archived: (Archived) used to store the process project files, associated with the new project tool "Move to Archive".
Editing: Premier and other editing projects
Compositing: Compositing projects such as After Effects, Fusion, Nuke, etc.
Assets: Used for storing materials.
Models: Used for storing models and proxies, which can be imported by double-clicking on them or exported by dragging and dropping them.
Music: Sound clips
Video: Video clips
Picture: Picture material
RenderSEQ: with its own Token, you can fully automate the rendering of image sequences to this folder.
Preview: Preview files obtained by using the Screen Shot command are stored in this folder.
StillFrame: store still frames
Search: search for objects matching the criteria at the current address.
TreeView :
Address : The address of current folder
Mouse hover will prompt the current folder function, if it is not a folder then show the path
Double Click :
If the object is a folder, go to the folder
If it is a file:
If it is a format supported by C4D, such as a proxy, model, C4D file, etc., it is imported according to the respective rules
If it is not a format supported by C4D, it is opened using the default application.
Shift Click and file is C4D file : Merge it into current project
Alt : Use Windows Explorer to open the folder where the selected file is located
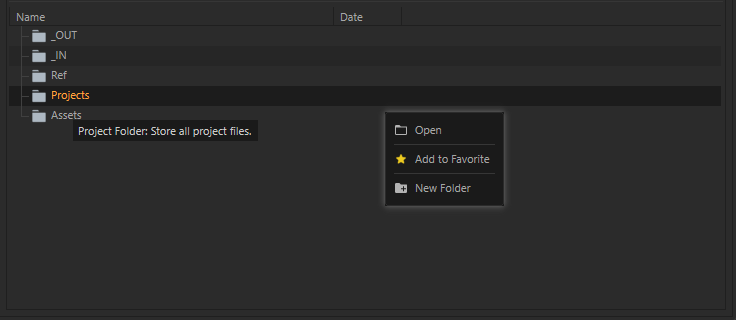
Right Click :
Open file
Open Folder
Add to Favorites : Add the current folder to the Favorites list.
New Folder
Move to Archived: move the project to Archived folder
Edit Note : Add a note to this project.
Drag :
Inside Drag : Drag C4D items into the Work Flow dialog
Export model, you can export to FBX, ABC, OBJ, C4D common formats, you can also export the renderer agent (support Octane, Redshift, Arnold, need to install the corresponding renderer)
Export lights as C4D files with LIGHT_ prefix, which can be imported by double-clicking.
Export materials as C4D files with MATERIAL prefix, can be imported by double-clicking.
Outside Drag : Drag Windows items into the Work Flow dialog
Analogous to Windows Explorer
Drag : Ask for move or copy
Ctrl(Holding) : Copying,, and the absence of modifier keys lets the user choose.
Shift(Holding) : Moving, and the absence of modifier keys lets the user choose.
Special :

Ctrl + C to copy an object, essentially copying the path of the object
Ctrl + V to paste objects copied in Work Flow to the current directory.
Video tutorial
Future plan
Add Quick AOV Set
Add direct aov for Redshift
Sort functions
Quickly start program like AE/PR/etc
Send previews to edit software pr/davinci
Send project to ....
Fold image sequence
Auto set camera
Open token folder
etc..